Hidden keyboard and search shortcuts in Grasshopper

Keyboard/mouse shortcuts

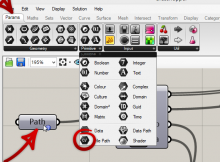
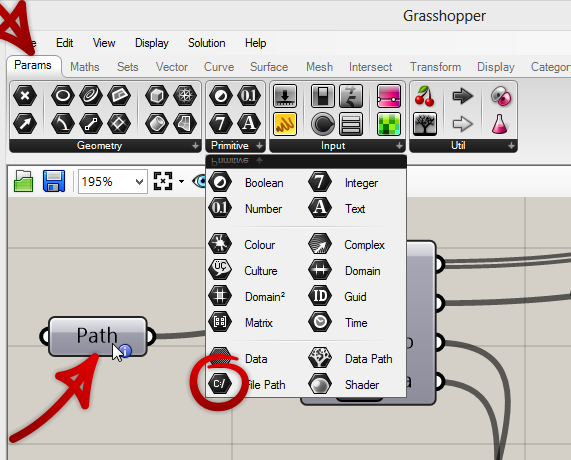
Ctrl + Alt: Get category and subcategory of component. Want to know where the ‘path’ component lives? Hold Ctrl + Alt, then click on it.

grasshopper-ctrl-alt-shortcut

Keyboard shortcuts

Modify the draw order

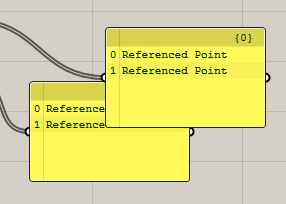
The draw order affects which components sit on top of each other visually. It also affects the calculation order.

Ctrl+B: send component to back of draw order (and will be calculated first)
Ctrl+F: send component to front of draw order (and will be calculated later)

Grasshopper draw order shown by two panels

Search bar shortcuts

Create a number slider

3 3-slider A slider from 0 to 10 (integers)
300 300-slider A slider from 0 to 10 (2 decimal places)

References

http://www.grasshopper3d.com/forum/topics/what-hotkeys-and-shortcuts-are-available-in-grasshopper

Python: Create a ZIP file and add files to it

With the following code, we can easily create a ZIP file in Python, and then add objects to it.

from zipfile import ZipFile

# Here, I am defining the zip file and path from a project called u.name
# The 'w' means 'write'
# Don't forget the .zip in the file name
zipName = u.name + "_" + datetime.today().strftime("%Y%m%d%H%M") + ".zip"
zipPath = settings.MEDIA_ROOT / u.name
zipObj = ZipFile(zipPath / zipName,'w')

# We can then add a file to our ZIP. This file already exists elsewhere, under the savepath variable. 
# filename is the name of this file as saved within the ZIP file
zipObj.write(savepath, filename)

#finally, remember to close the ZIP file once done
zipObj.close()

Grasshopper: Get intersection points between a list of lines with C#

The following code will produce a list of points that correspond with the intersection points between an assorted list of lines.

It is written for the C# component in Grasshopper, but can be adapted to a compiled component if desired.

Note the check that 0<a<1 and 0<b<1. This represents the requirement that we want intersections to occur along the length of the line, otherwise we aren’t interested in them. If we are also interested in implied intersections (i.e. where we imagine each line continues to infinity in both directions) then we can discard this ‘if’ statement.

And a note to my future self, this code worked on quick tests but was buggy on a real project, so the code below is for reference only!

  private void RunScript(List<Line> x, ref object A)
  {

    List<Point3d> rtn_pts = new List<Point3d>();
    for (int i = 0; i < x.Count - 1; i++)
    {
      for (int j = i + 1; j < x.Count; j++)
      {
        double a;
        double b;
        Rhino.Geometry.Intersect.Intersection.LineLine(x[i], x[j], out a, out b);
        if(a >= 0 && a <= 1 && b > 0 && b < 1)
        {
          rtn_pts.Add(new Point3d(x[i].PointAt(a)));
        }
      }
    }

    A = rtn_pts;

  }

Grasshopper: Manipulate the branches of an existing tree with C#

Say you have a datatree in Grasshopper. It has two levels of branches, and each branch of data has a number of items. We want to ‘flip’ the branches around, but leave the lists of data at the end of each branch intact.

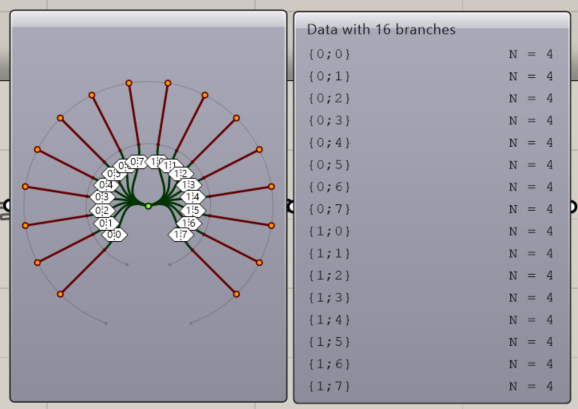
As an example, let’s use the following structure:

And here’s what we want it to look like after:

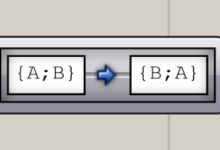
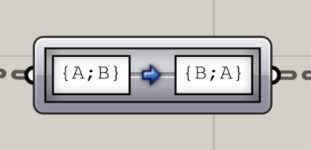
As a param mapper, this action would look like this:

grasshopper-param-mapper

How would we perform this action using the C# code block?

  private void RunScript(DataTree<object> x, object y, ref object A)
  {

    DataTree<object> rtnTree = new DataTree<object>();
    for (int p = 0; p < x.BranchCount; p++)
    {
      int[] pathint = x.Path(p).Indices;
      GH_Path flippath = new GH_Path(new[] {pathint[1],pathint[0]});

      foreach (var item in x.Branch(new[] {pathint[0],pathint[1]}))
      {
        rtnTree.Add(item, flippath);
      }

    }

    A = rtnTree;

Eurocodes structural design: Should you pattern loads?

When designing structures, the critical design case can arise when high levels of load are applied to one area while low levels of load are applied to another. Applying varying levels of load to structures to try and find a worst case is often referred to as pattern loading.

In British Standards, pattern loading could be done by splitting the dead and live loads into their minimum and maximum factors of safety.

In Eurocodes, it’s not quite as simple.

Firstly, there are several checks that are typically done. The two relevant in this post are EQU and STR. With EQU, we are checking that the structure as a whole is stable and in equilibrium. In STR, we are checking the performance of the structural elements. The method for patterning is different for each.

The methods for each are described in EN 1990. The values given below are also taken from this document. Your country may have supplementary guidance and values in its National Annex.

Patterning for EQU

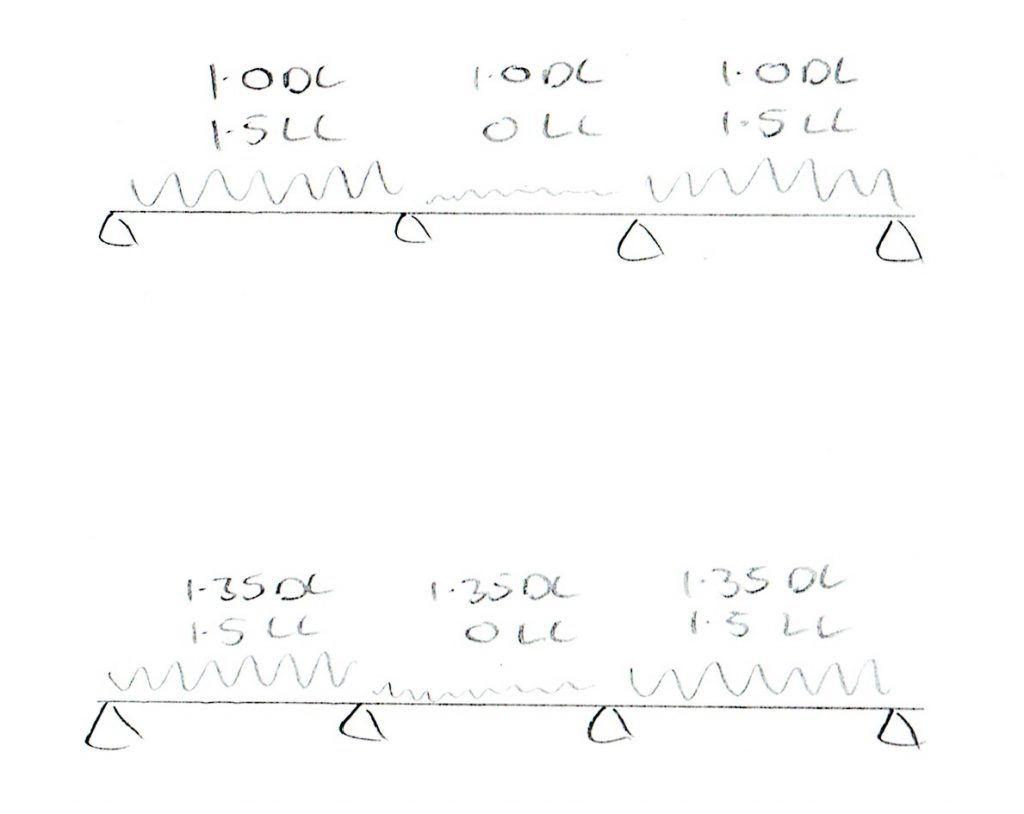
When checking for static equilibrium, both the dead load (permament actions) and live load (variable actions) may be patterned.

Note that the partial factors are different from the STR values you will be more used to using.

In the cantilever below, the beam is resting upon supports. An EQU check with onerous load patterning may show that the cantilever will overturn. To be stable, the cantilever would either need to be shorter, or the beam would need to be tied down at the left hand side.

Ref: Table A1.2(A) of EC0

Patterning for STR

When checking the resistance of structural elements, only the live load is patterned.

What about the dead load? We can choose the worst partial factor of 1 or 1.35, but we must use the same partial factor for permament actions on our entire structure. This is as described in Note 3 of Table A1.2(B).

If it is obvious whether the lower or higher value will be onerous, then you only need to check this value. If it is not obvious, then you will need to check your structure with both values.

Ref: Table A1.2(B) of EC0

Should I check for both STR and EQU?

In clauses 3.3 (4) and 6.4.1 (1) of EC0, we are told that we must verify both STR and EQU (and other ultimate limit states) ‘where relevant’.

In practice, many situations are obviously going to be stable under EQU, such as a simply supported beam. Here, I would say that EQU is not relevant, and we can move straight on to STR.

When might we design under EQU conditions? In the cantilever above, let’s say that EQU shows that a vertical tie is needed on the left support. If the uplift on this support is greater under EQU than STR, I would use the uplift under EQU as the design effect to be resisted when designing the tie.

Many thanks to Bob Benton for clearing this up for me, while I was on the 2017 EC2 course organised by the IStructE Western Counties Regional Group.

Send files to your cPanel web host via FTP

If you have a webhosting account, you will find that you need to send files to it from time to time.

Many webhosting accounts use cPanel for users to interact with their online account. This comes with a File Manager, which you can use to send and browse the files in your online space.

This is fine for the odd file, but if you want to move many files, it’s very difficult to do this quickly. There has to be a better way!

FTP (File Transfer Protocol) is the answer. Without getting technical, it’s a way of easily sending files between your computer and a server.

You may have heard of FTP before, but you’re not really sure how to use it. If so, this guide is for you!

Here, I will show you how to setup FTP to easily send files to your webhost.

Step 1: Install FileZilla (or your client of choice!)

Firstly, we need to install an FTP client. This is a program which is installed on your computer, which uses FTP to communicate with your server.

There are many FTP clients available. I use FileZilla for the simple reasons that it’s widely used, free, and works. I will be using FileZilla for this guide. You can download and install it from here.

Step 2: Get FTP configuration file in cPanel

Next, log in to your webhosting account, and open cPanel. (I am using SiteGround, so yours may look a little different, but the process should be similar.)

Under cPanel home, find Files, and open FTP Accounts:

You should now see a list of FTP accounts you can use, for example:

Now, you need to decide which account you want to use. If you are the administrator or the only user of the account, you should look at the account that has the same name as your username. (This is the root account – look for the one with the most data.) But if you are creating an account for someone else, and you only want to give them access to a specific folder, you should use the option to add an FTP account.

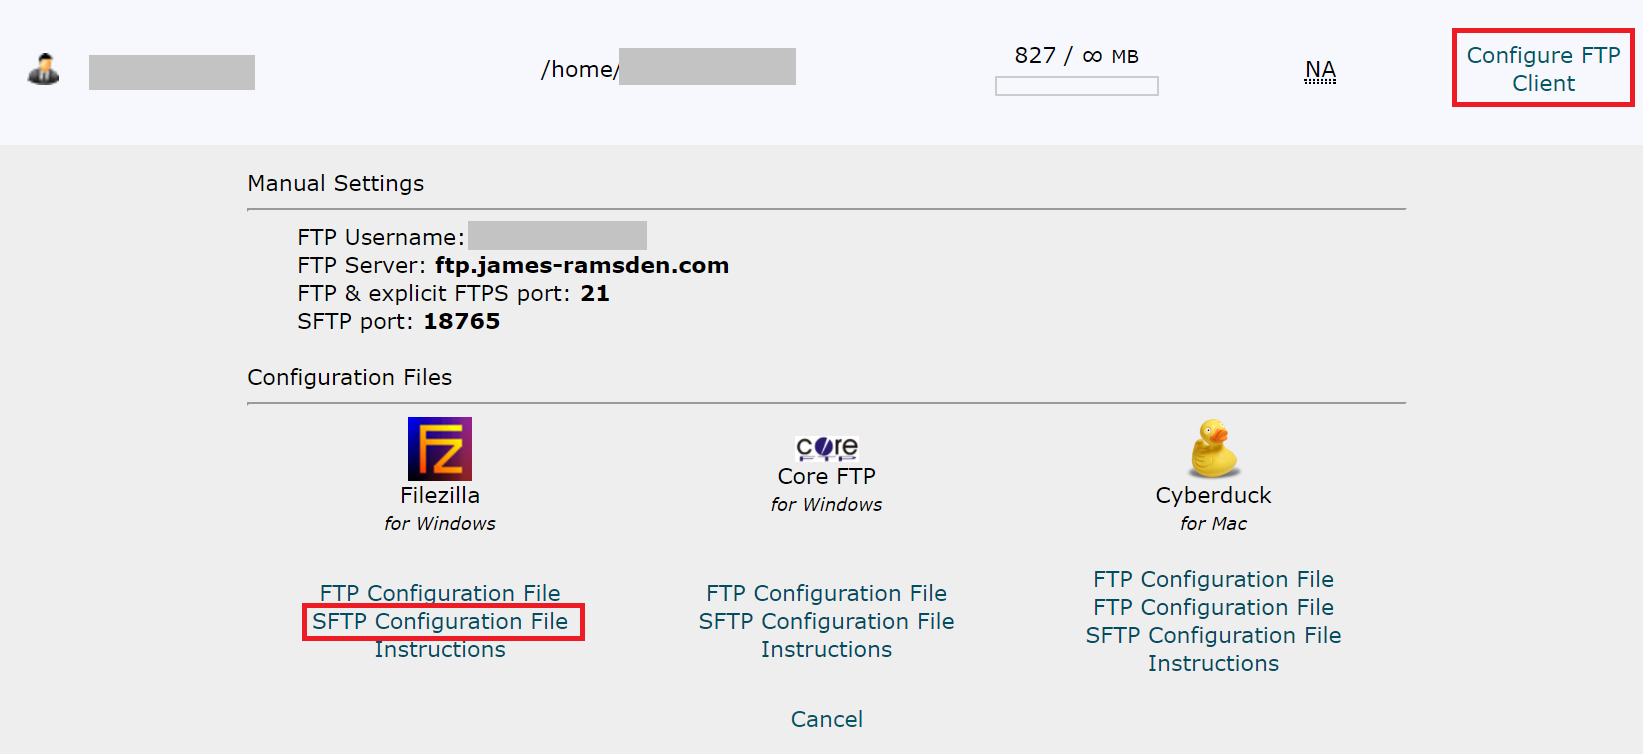
Once you have chosen which FTP account you want to use, click on Configure FTP Client:

You want to download the configuration file for your FTP client. SFTP (secure FTP) is better, but if it’s not available, or you have problems with SFTP, FTP configuration file is okay.

(No configuration file for your client? Skip to the last section!)

Step 3: Import FTP configuration file to FileZilla

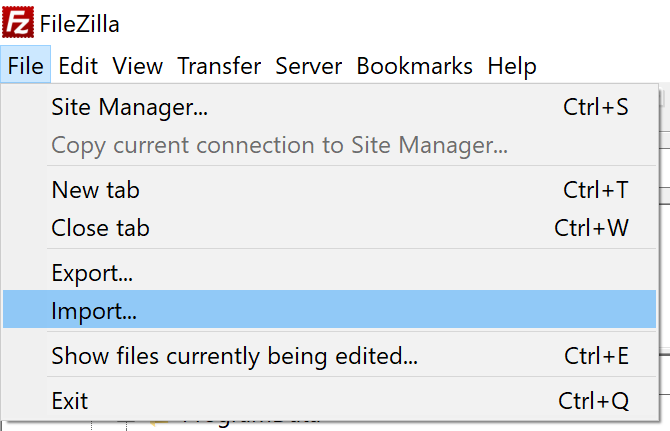
Open FileZilla. Go to File > Import. Open your configuration file that you just downloaded.

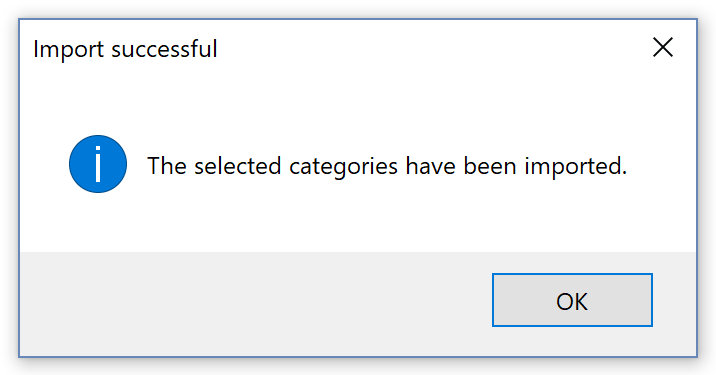
Confirm any messages that appear.

Step 4: Connect!

Now, we are ready to connect to our FTP account.

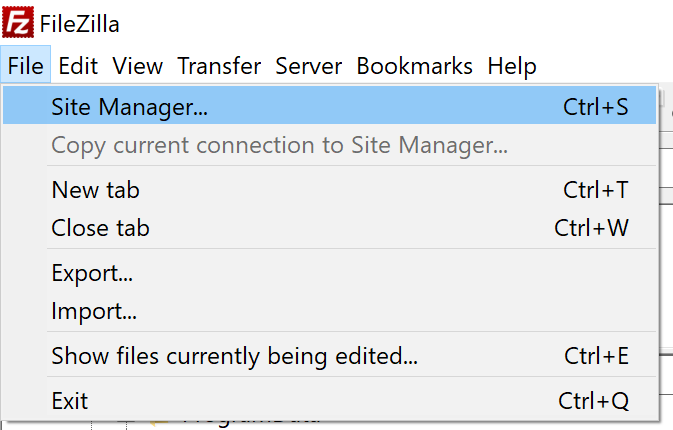
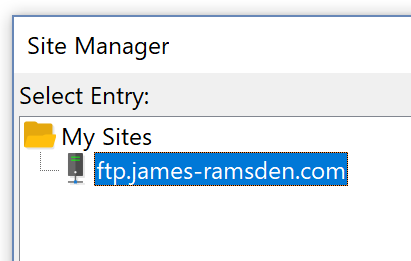
Go to File > Site Manager.

You should see an entry on the left. This is the FTP account we just added.

Select it and press Connect.

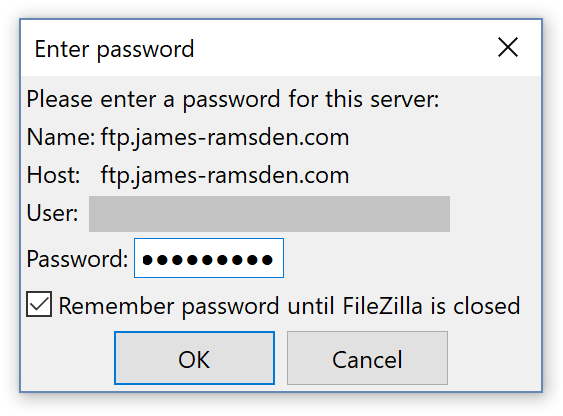
Enter your password. This will either be the password of your hosting account or, if you created an FTP account earlier, the password you made then.

If all has gone well, you should see your files appear in the main window. This is a direct link to your hosting account, and you can drag and drop files and folders into this window as you would the files on your own computer. They will be synced automatically to your hosting account. Nice!

In future, when you want to use FileZilla, head straight to the Site Manager, and connect from there. It will remember your configuration file, but you will need to put your password in each time.

The Last Section: Connecting without a configuration file

If, for whatever reason, you can’t use a configuration file, you can connect manually.

In step 2, instead of downloading a configuration file, look at the manual settings.

Then, in FileZilla, put these manual settings into the text boxes near the top of the window (click for full size):

Finally, hit Quick Connect. The process should be similar for other clients.

How to get to Niseko Grand Hirafu ski resort

Niseko is by far the most popular ski resort in Hokkaido. Its world-famous powder is joined by Japanese culture to give an experience like no other.

Niseko is actually a combination of four ski areas on the same mountain. They are quite far apart at the bottom, but the ski areas meet at the top. They are:

  • Hanazono
  • Grand Hirafu
  • Niseko Village
  • Annupuri

The best-developed of these, and the most popular for international tourists, is Grand Hirafu. It is not close to many towns and can be quite difficult to get to. This guide will show you the different ways on how to get to Niseko Grand Hirafu.

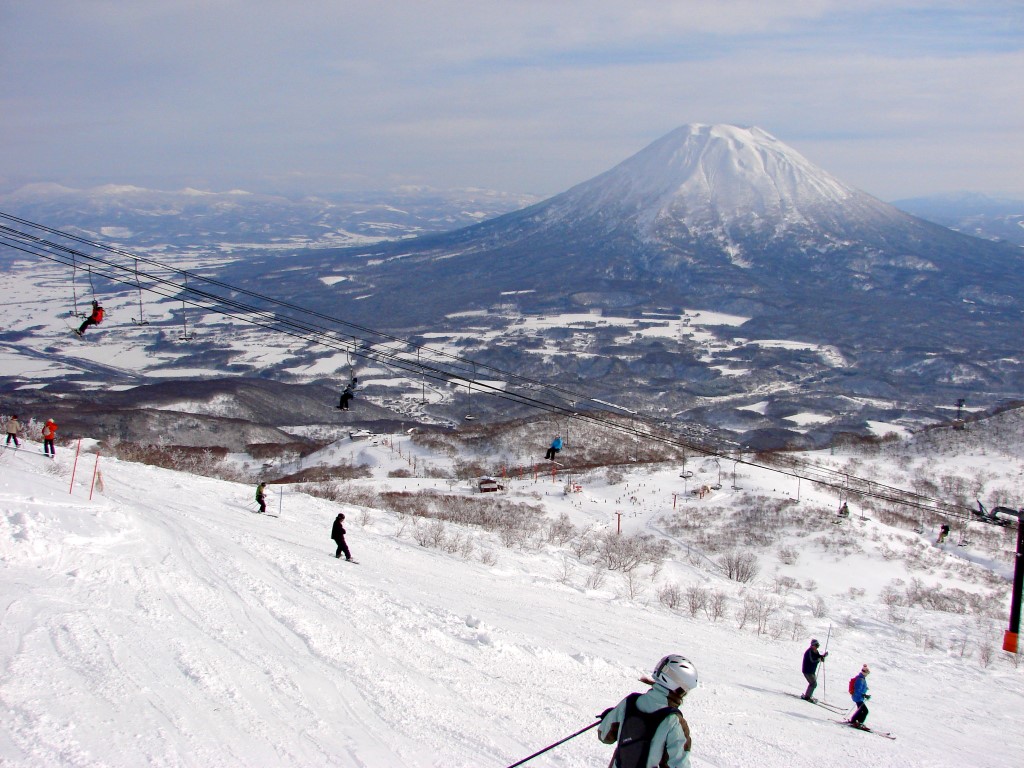
View of Mount Yotei from Niseko ski resort, Hokkaido

View from Grand Hirafu. Image source

First, get to Hokkaido

Hokkaido is a large island at the north of Japan, about the size of Ireland or slightly smaller than South Korea. Its main city is Sapporo.

The easiest way to Hokkaido is by air to Shin-Chitose Airport (New Chitose Airport). Most people fly to Tokyo and get a connecting flight. Some international flights also fly directly to Sapporo, e.g. from Kuala Lumpur using AirAsia.

Once at the airport, if you want to go to Sapporo first, it’s very easy to go by train. Trains to Sapporo are every 15 minutes directly from the airport’s station, and cost 1070JPY each way.

Then, get from Shin Chitose Airport to Niseko

Most people transfer from the airport by bus. Niseko bus runs four services a day through the winter directly to Grand Hirafu. Check the timetable for times and stops. (Note: Niseko Hirahu = Grand Hirafu). The fare is 4400 yen per person. Reservation is recommended during peak season.

The bus will drop you off at the Welcome Center in Grand Hirafu, which is a large car park at the top of the village. Contact your hotel to see if they will pick you up from the Welcome Center. Otherwise, you could take the village’s B-Line bus around the village. Or you could walk – most hotels are walking distance away.

…Or get from Sapporo to Niseko

There are two buses a day from Sapporo to Niseko, and two coming back. Check the Niseko Bus page for times and stops.

As above, the bus will drop you off at the Welcome Center.

Can you get to Niseko by train?

There are no useful train services all the way to Niseko. Don’t get fooled by the fact that there is a train station called ‘Niseko’ nearby. This serves the village of Niseko (not the same as Niseko Village) which is actually quite far from the ski resorts.

It is better to take the train to Kutchan, the town nearest to the ski resorts. Then, from Kutchan, you have several options:

The shuttle bus is the obvious choice if you are on a budget, but check the link above first. The buses only run in the evening and during peak season, primarily so that people staying in the resort can enjoy Kutchan’s restaurants.

To go by train, the route is:

Airport — Sapporo — Otaru — Kutchan.

You sometimes have to change at Sapporo, and you definitely will have to change at Otaru. The fare is currently 2630 yen. Check your route with Hyperdia.

If you are wanting reservations, it is generally not possible to reserve trains outside of Japan. In any case, The majority of services on these routes are unreserved anyway – just buy a ticket and jump on.

What about the ski train?

You may have heard of the Niseko Ski Train. This is a direct, express service from Sapporo to the village of Niseko, stopping at Kutchan on the way. It avoids needing to change at Otaru. The train runs a few times a day during the winter season.

The best way to get times is probably just to check your route on Hyperdia. If the ski train is running when you want to travel, Hyperdia will show it as a possible route.

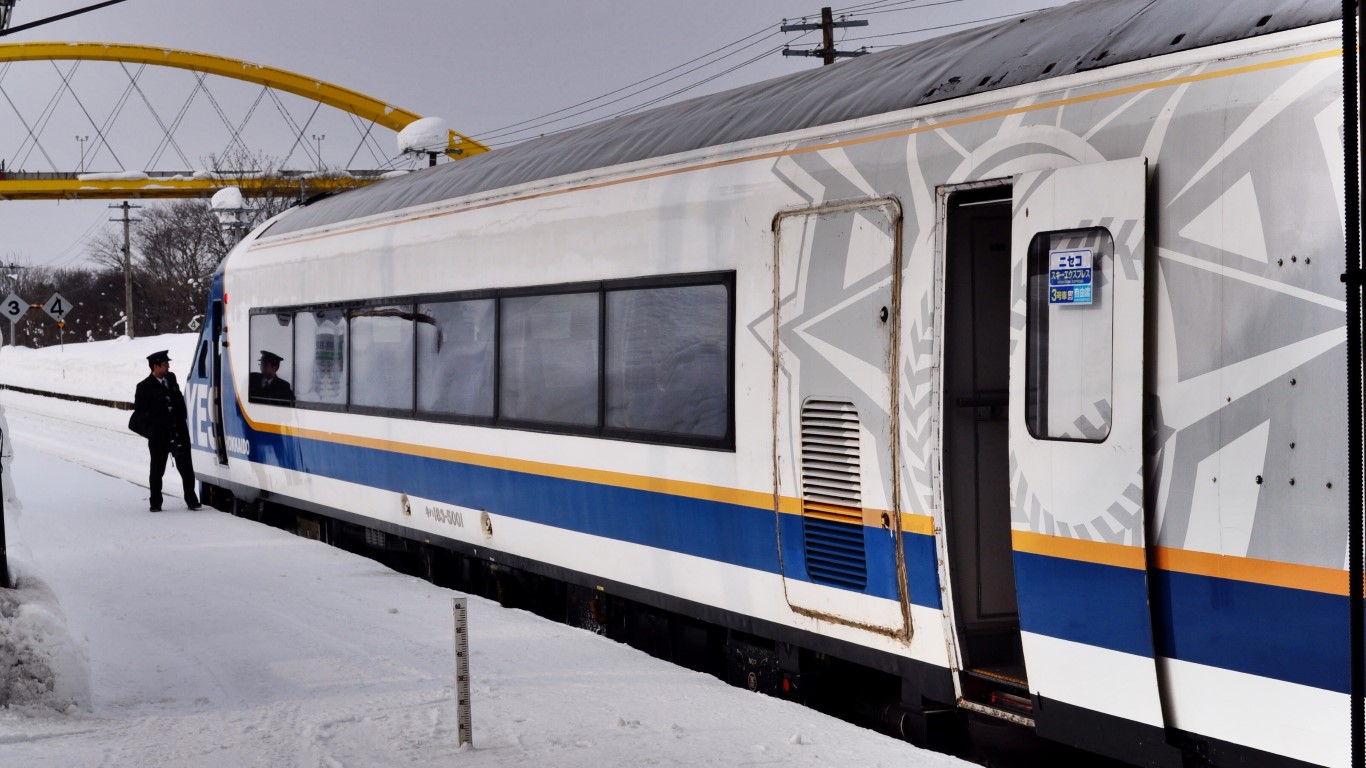
Niseko Ski Express train, Hokkaido Japan

Niseko Ski Express. Image source

Can you take a day trip to Niseko?

Many ski resorts in Hokkaido are a short train or bus ride from Sapporo – the best base for a day-trip style ski holiday. This is a great way to ski in Hokkaido on a budget, since you can stay in cheap Sapporo accommodation, and use a tourist rail pass to get around.

Niseko is just a little too far from Sapporo to visit just for the day to get a good day of skiing. However, if you don’t mind having a slightly shorter day, it can be done, if for a few hours:

  1. Take the 07:55 bus from Sapporo bus station.
  2. Arrive at 11:01 at the Grand Hirafu Welcome Center
  3. Go ski!
  4. Catch the 17:09 from the Welcome Center back to Sapporo

This gives you about 6 hours in Grand Hirafu – remember to factor in travel time to/from the Welcome Center.

One disadvantage of not staying the night is that you don’t have a hotel who might provide help with transport. On the plus, accommodation in Niseko is expensive

Header image source courtesy of Mark Kenworthy under Creative Commons licence

How to apply for a Japan Working Holiday Visa (UK guide)

The Working Holiday Visa is probably one of the best ways to visit Japan. It’s the best of both worlds – you can stay longer than on a tourist visa, and you can also get a unique insight to the country by working alongside the people of Japan.

The usual tourist visa for British citizens visiting Japan is three months. However, the Working Holiday Visa for Japan permits you to stay for up to a continuous period of 12 months.

I recently applied to work over the winter season in a Japanese ski resort, and the Japanese Working Holiday Visa was the obvious choice for me. Here, I will explain what this visa is, and how I applied for it.

This account was written from a UK point of view. Most of the information here is relevant to all countries on the Working Holiday Visa programme, but there may be some small regional differences, so be sure to check the website of your local embassy.

Step 1: Do your research – is the Working Holiday visa right for you?

Firstly, you have to ask if the Working Holiday Visa is right for you. Note that the application process is quite lengthy, so for a regular non-working holiday, it is infinitely easier to get the usual stamp in your passport on arrival.

Also note that the Working Holiday visa is not a replacement for a full employment visa. If you are going to Japan exclusively to work full-time, you are unlikely to have your application granted.

With that in mind, what are the criteria for applying? Here are the requirements from the Japanese Embassy in the UK:

  • Be British Citizens who are resident in the United Kingdom
  • Intend primarily to holiday in Japan for a period of up to one year from the date of entry
  • Be aged between eighteen (18) and thirty (30) years both inclusive at the time of application for a Working Holiday Visa
  • Be persons who are not accompanied by children
  • Be persons who are not accompanied by spouses unless those spouses are in possession of a Working Holiday Visa or otherwise
  • Possess a valid passport and a return travel ticket or sufficient funds with which to purchase such a ticket
  • Possess reasonable funds for their maintenance during the period of initial stay in Japan
  • Intend to leave Japan at the end of their stay
  • Have not previously been issued a Working Holiday Visa (except where you were unable to use the Working Holiday visa issued due to unavoidable circumstances, and an application for
    re-issue is made no more than 3 months from the expiry date of the original Working Holiday visa.)
  • Have good health

I have emphasised the main limitations.

The intention of the programme is to promote cultural exchange by allowing young people to spend an extended period in Japan. This is why there is a low age limit. It is also not suitable for family travel for similar reasons.

Notice how there is no requirement to actually work – perhaps surprising, given the visa’s name. The primary focus is to holiday, whilst using work to supplement your funds and as a method of integrating with the Japanese during your time there.

You are also required to have sufficient money to fund the first few weeks or so, as well as your return journey. The Embassy defines ‘possessing sufficient funds’ as:

    Either £2,500 in cleared funds (last 3 months bank statements must be shown)
    Or £1,500 and a return or onward journey ticket or a receipt for such.

Finally, each person can only use one Working Holiday Visa for Japan in their lifetimes. Use yours wisely!

Step 2: Prepare your documents

So you’ve decided that the Working Holiday Visa is right for you? Now, we need to prepare our documents. This can take a little bit of time – you may need to set aside a few hours for this.

This list of documents is taken from the official embassy page.

All documents need to be printed – ideally on A4 paper. Once you have prepared your documents, you will need to take them to the embassy in person to apply for your visa.

Passport

Must be valid for the entire duration of the visa – i.e. 12 months. Also, it is common practice for visa-issuing authorities to demand that a passport has another 6 months’ validity. So if your passport is due to expire within 18 months of your arrival in Japan, I would look into renewing your passport.

Also make sure that there are two blank, consecutive pages free.

Completed visa application form

This form can be a bit tricky to fill out. The ‘Visa Application Form’ is in fact a standard form that the embassy uses for all types of visa applications. From what I gather, it is not necessary to fill out every field, although the more you can complete the better.

For example, it asks for your port of entry, entry date, and flight number. Of course, if you haven’t booked your flight yet, you won’t have this information – and you might not want to book them until your visa is confirmed!

Similarly, you may not have any contacts in Japan for the ‘Guarantor’ or ‘Inviter’ fields.

In my case, I already had a potential job offer and my flights were already booked, so I can’t say for certain what would happen to your application if you left these blank. When you eventually submit your application to the embassy, you will be able to ask any questions there. Other accounts (see links at the end) seem to back this up – it’s not the end of the world if you can’t fill everything in.

One passport-sized photograph

This is purely for the embassy’s records – they’ll use your passport photo for the visa itself. Glue it on to your application form – no sellotape, staples or paperclips!

CV

If you are applying for a Working Holiday Visa, you are intending to work. If you are intending to work, you need a CV! Get it done now so it’s out the way.

Outline of intended activities

This is a concise list of your plans in Japan. Keep it short – a bullet point list of dates, regions and activities should suffice. Here was mine:

  • Arrive in Sapporo at end of October.
  • November – March: Living and working in Hokkaido. Working in a ski resort, and skiing during free time. Intending to work/stay in Niseko due to the demand for English-speaking employees.
  • April (or at end of ski season): Free time in Japan. Intending to travel around Hokkaido, then around Tokyo, before flying back to the UK.

A written reason for applying for a Working Holiday Visa

If this visa is like applying for a job, then this would be the covering letter. This is where you get to explain why, for example, you want to visit Japan, what you will get from your time there, or how you might help UK-Japanese relations. This is where you convince the embassy official that you intend to use the opportunity provided by the visa to its fullest.

It’s also an opportunity to explain why you are applying for the Working Holiday Visa instead of a normal tourism or employment visa. Make sure you understand the benefits and limitations of this visa, and explain why it will allow you the best chance of fulfilling your plans in Japan.

Bank statements showing sufficient funds

You also need to send your last 3 months of bank statements. You need to show that you have enough funds (£2500 for a solo traveller) to cover your initial time in Japan.

Since I do all of my banking online, I don’t have these statements to hand. Instead, I logged on to my banking and printed the statements at home.

Why they want 3 months I don’t know. Maybe they want to see that you haven’t just borrowed money from family?

Note that borrowed money, such as overdrafts and credit cards, doesn’t count.

Step 3: Go to the embassy

As far as I know, you must apply at the embassy in person. You can’t apply by post, online, or by sending someone else for you. You can go to either London or Edinburgh – I went London. Make sure you have all of your documents with you.

You do not need an appointment. Just turn up during opening hours (and not right before closing time!). Tell security at the front door that you’re there to apply for a visa, and they’ll send you in the right direction.

In London, there was a waiting area where I collected a ticket and waited for my number. After only about 5 minutes, my number came up, and I walked through to the next room. There is a row of post-office-style counters.

A friendly young Japanese woman greeted me. I gave her my documents. She flicked through them all quite casually, like she was reading a magazine. She asked me a couple of simple questions (I had forgotten to fill part of my application form), but nothing at all challenging. She asked what I was going to do there (“oh, you’re going skiing? ワォォ!”) and if I’d applied for a Working Holiday Visa before.

She then stamped some documents, and gave me a receipt. She took my passport from me, and said to come back in one week. There would be a visa fee of £16 to pay on collection – to be paid in cash with exact change only.

As I understand, what happens in this week is that the application is sent to an official who will then approve or reject the application.

The receipt will be printed with your collection date. It is very important that you don’t lose this receipt, and you bring it with you to collect your passport.

Step 4: Pick up your passport

Picking up your passport requires a second trip to the embassy on your collection date, about a week after applying. This is a pain if, like me, you live hours away from the nearest embassy. You can send someone else to pick up your passport for this second visit though – follow the instructions on your receipt for how to do this.

This should be a very quick visit – just get a ticket and visit the visa window like before. Hand the staff member your passport receipt and the fee (in exact change!).

You’ll find your brand new visa pasted inside your passport!

Visa dates

The visa they gave me was dated as being valid until 13 October 2017 – apparently 12 months after my application was processed in Japan.

However, this date seems to be the latest you can arrive in Japan and register your residency (in the next step) – not the date you must leave Japan. When I registered in Japan, my residency card was dated to expire on 29 October 2017 – 12 months after I arrived.

My understanding is that I am able to stay in Japan until my residence card expires, i.e. on 29 October. I am not entirely sure here. If you are likely to be cutting it fine with your leaving date, I would advise you contact the embassy for clarification.

Step 5: Arrive in Japan

Have a safe flight!

On the arrivals card (given to you on your flight, if not you’ll find them in the airport in immigration), for ‘purpose of visit’ I selected ‘other’ and wrote ‘Working Holiday’.

At immigration in Japan, take the foreigners queue. The immigration official will give you a credit card-sized Residence Card. Keep it safe!

They will also staple a piece of paper entitled ‘Designation’ in your passport. Your employer in Japan will need a copy of this too.

Step 6: Register your residency

You’re in Japan now – are we not done already??

There is one final step. Within 2 weeks, you need to have gone to the local Government Office to register your residency.

You need an address in order to register. This is why it’s helpful to already have an employer by this point, but I assume you could use a hotel address if it’s all you have.

It’s helpful to have a Japanese speaker with you when you visit the government office, though it isn’t essential. If you’re in an area popular with foreigners, the staff may have some basic English ability, and the forms you need to fill are bilingual anyway.

How do I find my government office?

All cities and larger towns have a government office.

Perhaps the easiest way is to go to Google Maps and search in your area for 役所 (Japanese for Government Office).

More information

The Working Holiday Visa for Japan is available to citizens in a number of countries around the world. This official page lists the 16 participating countries: Australia, New Zealand, Canada, Republic of Korea, France, Germany, UK, Ireland, Denmark, Taiwan, Hong Kong, Norway, Portugal, Poland, Slovakia and Austria.

Here are some other blog posts from around the web of other people who have applied for a Working Holiday Visa.
Send a command from Grasshopper to Rhino in C#

In Grasshopper, it’s possible to send commands directly from Grasshopper to Rhino. How? By using the C# component.

Simply add the following line to your C# code.

Rhino.RhinoApp.RunScript(string script, bool echo);
//script: The command to send
//echo: Set to true for the command to appear in Rhino's command prompt

For example, if I want to automatically save the Rhino document, I could add the following to a C# component:

Rhino.RhinoApp.RunScript("Save", true);

For more complex commands, we can use some special syntax. For example, if I want to save the file with a custom filename, I can use:

Rhino.RhinoApp.RunScript("_-Save test3.3dm", true);

The hyphen allows us to modify parameters, and the underscore allows us to enter more than one command at once without Rhino waiting for manual user input.

More information

The full list of Rhino commands is available here.

For more detail about using the RunScript method, read this.